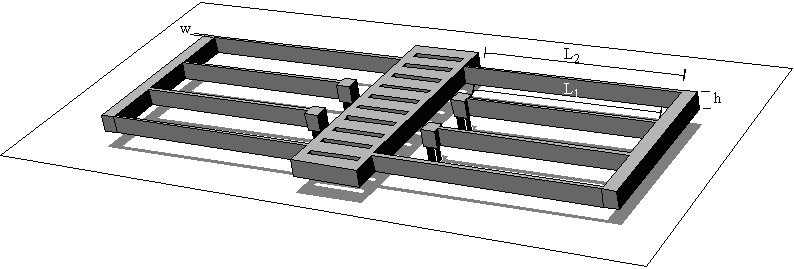

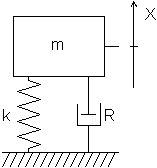
The structure in Figure 1 is equivalent to the mechanical schematic diagram in Figure 2. The damping element is the representation of all source of damping inside this structure: mechanical damping in the springs and support, airflow, acoustic radiation
The problem we address is to evaluate:
![]() (1)
(1)
where m is the mass and a the acceleration.
The force generated by an ideal spring is linked to the displacement of its end, Dx, by:
![]() (2)
(2)
where k is the so-called spring constant.
The forces exerted on the mass at equilibrium are balanced, and we have:
![]() (3)
(3)
Equation (3) yields the fundamental relation linking the displacement of the mass with the acceleration:
![]() (4)
(4)
where Cmech is the mechanical sensitivity expressed in s2 or in m/g (1 g = 9.8 m·s-2).
The typical MEMS-structures have weight below 10-9 kg; thus, an 1 g-acceleration will move the mass of a fraction of µm, an important fact to consider for the design of the detection of displacement. The important unknown parameter of relation (4) is k, the spring constant of the suspension along the sensing direction. The next section will be devoted to the analytical evaluation of this quantity.
All the suspensions shown above are obviously folded beams that could be easily decomposed in a set of simple beam placed either in series or in parallel. An interesting point to consider is that all the simple-beam ends move parallel to the X-axis without rotation. Thus it is possible to decompose further the simple beam in two cantilevers in series. This simple consideration is shown in Figure 3.
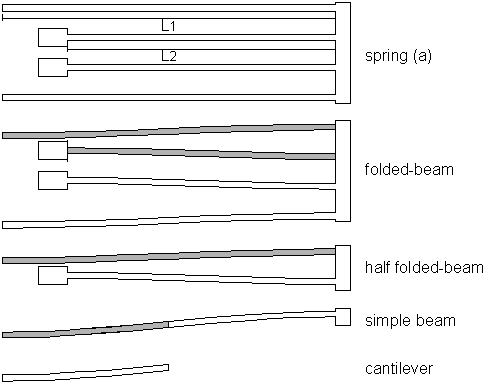
The cantilever of length L1/2 has a spring constant given by:
kCantL1 = 3EI/(L1/2)3 = 2Ehw3/L13 (5)
where E is the Youngs modulus of the material, I is the area moment of inertia about the centroidal axis of the beam rectangular cross section, h is the height of the beam and w its width (i.e., parallel to the X-axis).
As the simple beam of length L1 has a guided end, the symmetry allows for considering it as two identical cantilevers in series, thus its spring constant is asserted using the composition rule for two springs in series:
kSimpleBeamL1 = 1/(1/kcantL1 + 1/kcantL1) = k cantL1/2 (6)
The simple beam of length L2 has also guided ends and can be considered as a similar spring in series with the previous beam. The spring constant of the half folded-beam is then:
kHalfFoldedBeam = 1/(1/ kSimpleBeamL1 + 1/ kSimpleBeamL2) = 1/(2/kcantL1 + 2/kcantL2) (7)
The folded-beam spring constant is assessed by saying that it consists of two identical springs in parallel:
kFoldedBeam = 2 kHalfFoldedBeam = 1/(1/kcantL1 + 1/kcantL2) (8)
Finally, as there are two springs supporting the mass, the spring constant for the suspension (a) along the X-axis is:
 (9)
(9)
Following a similar reasoning we find:
 (10)
(10)
 (11)
(11)
 (12)
(12)
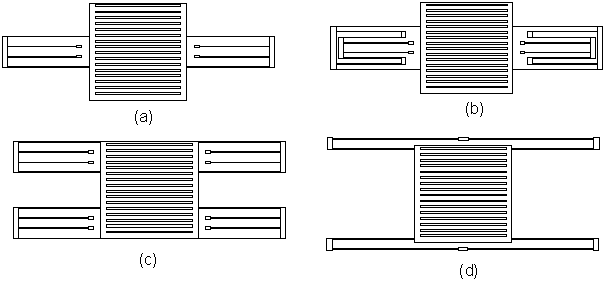
For the same length of beam hanging out of the proof-mass (L1), the spring constant of the suspension (a) is two times higher than that of the suspension (b) but two times lower than that of the suspension (c). It is also higher than that of the suspension (d), which benefits of recessed anchors (longer L2).
Example 1: with a suspension of type (a) and L1=240 µm, L2=300 µm, h=2 µm, w=2 µm, E=170 GPa (polysilicon) we find k = 0.266 N/m.
If the mass of the proof-mass is 0.294 ´ 10-9kg (i.e., 300 µm ´ 300 µm ´ 2 µm polysilicon square plate with shutter holes), the acceleration needed to obtain a displacement of 1 µm is about 92 g. Conversely an acceleration of 1 g will produce a displacement of 11 nm.
The mechanical sensitivity is thus: Cmech = 11·10-9 m/g.
Example 2: with a suspension of type (a) and L1=440 µm, L2=500 µm, h=2 µm, w=2 µm, E=170 GPa (polysilicon) then k = 0.05 N/m.
If the mass of the proof-mass is increased by 4 (1.17 ´ 10-9kg), the acceleration needed to obtain a displacement of 1 µm is about 4.3 g. Conversely an acceleration of 1 g will produce a displacement of 0.23 µm.
The mechanical sensitivity is thus: Cmech = 230·10-9 m/g.
For the Z-axis, the figure is quite different because the beams are as wide as thick. Thus, in a first order, the mechanical sensitivity along the X- and Z-axis are the same. It appears that the detection of the displacement of the proof-mass should be carefully designed to reject the displacement along the Z-axis.
The analytic formulation of the resonance frequency of the structure allows for a better understanding of the structure that could not be easily obtained through numerical simulation only. However, the structure is already complex enough to justify the use of FEM simulations to determine the patterns of vibration and the frequencies of the higher order modes.
![]() (13)
(13)
where k is the spring constant in the direction of vibration of the mode. The mode with the lowest frequency will be in the direction of the lowest spring constant.
This formula is rigorously valid in the case of a point mass at the end of a weightless spring. In our case we have two real springs on both side of a large mass. The following results can thus only be seen as an approximate solution for the real structure.
It is possible to take into account the mass of the spring using the Rayleighs method. This method introduces in eq. (10) an effective mass that is the mass of a hypothetical structure that will have the same kinetic energy than the original structure but which will move at the maximum speed (i.e., the speed of the proof-mass).
We have to calculate the effective mass for the springs taking into account that their speed vary along their length. For a mass supported by two folded-beam springs with L1=L2=L, the integration yield:
![]() (14)
(14)
where the end plate is the rigid link at the spring fold (i.e., the endplate moves half the distance of the spring extremities, thus moves at half speed and store ¼ kinetic energy of the same structure at full speed).
Example 1: considering a density of 2300kg/m3 for the polysilicon, we have:
mcantL = 2·10-6 ´ 2·10-6 ´ 130·10-6 ´ 2300 = 1.20·10-12 kg
mendplate = 2·10-6 ´ 10·10-6 ´ 100·10-6 ´ 2300 =4.6·10-12 kg
thus meff = 2.94·10-10 + 2.3·10-12 + 6.6·10-12 = 3.03·10-10 kg
Thus f0 = 4715 Hz (in this case the correction due to the spring mass is not significant, f=4787 Hz without Rayleighs method ).
Example 2: With the mass of the proof-mass increased by 4 (1.17 ´ 10-9kg), and with the longer springs (L~470 µm):
mcantL = 2·10-6 ´ 2·10-6 ´ 235·10-6 ´ 2300 = 2.16·10-12 kg
mendplate = 2·10-6 ´ 10·10-6 ´ 100·10-6 ´ 2300 =4.6·10-12 kg
thus meff = 11.7·10-10 + 2.3·10-12 + 11.8·10-12 = 11.84·10-10 kg
Thus, f0 = 1034 Hz (neglecting the mass of the springs we find f = 1040 Hz).
![]() (15)
(15)
where d is the gap between the proof-mass and the substrate, A the area of the proof-mass, and µ = 18·10-6 kg/m s being the viscosity of air at 20°C.
Of course, other damping mechanisms exist in the structure (air drag on surface, air resistance at the edge ) and the quality factor computed with equation (12) should be better seen as a limit value for air operation. In a vacuum environment mechanical damping in the springs and support will dominate.
Example 1: The gap under the proof-mass is 2 µm while the area of the proof-mass is 300 µm ´ 300 µm and the effective mass is meff = 3.03·10-10 kg, thus for operation in air we have:
Q = 11
With such low quality factor it is possible to operate the accelerometer up to half of the resonant frequency while keeping the accelerometer in linear range. Thus, the operating range will be about 2000 Hz.
Example 2: The gap under the proof-mass is 2 µm while the area of the proof-mass is 600 µm ´ 600 µm and the effective mass is meff = 11.84·10-10 kg, thus for operation in air we have:
Q = 2.3
With such low quality factor it is possible to operate the accelerometer up to half of the resonant frequency while keeping the accelerometer in linear range. Thus, the operating range will be about 500 Hz.
The exact value of the damping does not need to be computed and can be asserted with the quality factor, Q, of the system under harmonic excitation. Thus, the thermal noise displacement for a damped (mostly from airflow) accelerometer outside the resonance is given by:
![]() (16)
(16)
where kB is the Boltzmanns constant, and w0 the pulsation at resonance. At the resonance, the displacement is multiplied by Q. Thus, from (15), it is apparent that the noise can be decreased by increasing Q, k, or f0.
Example 1: for Q = 11, with a spring constant of 0.266 N/m and a resonant frequency at 4715 Hz, we found a thermo-mechanical noise spectral density of:
|xn(f)| = 0.43 pm/Ö Hz.
In a 2kHz-band of frequency (staying off the resonance), the mechanical noise will be about 20 pm or an equivalent 2 mg.
Example 2: for Q = 2.3, with a spring constant of 0.05 N/m and a resonant frequency at 1034 Hz, we found a thermo-mechanical noise spectral density of:
|xn(f)| = 4.7 pm/Ö Hz
In a 500Hz-band of frequency (staying off the resonance), the mechanical noise will be about 105 pm or an equivalent 0.45 mg.
T. B. Gabrielson, "Mechanical-thermal noise in micromachined acoustic and vibration sensors", IEEE Trans. on Elctron. Dev., Vol. 40, pp. 903-909, 1993
W. C. Young, "Roark's formulas for stress & strain", 6th ed., McGraw-Hill, Singapore, pp. 100, 1989